Bootstrap Checkbox Design
Introduction
In some cases the most basic features might become really vital-- especially once you come to need them. As an example how do your website visitors interact with the webpages you build claiming a simple Boolean act-- simply just yes or no concerning a couple of the thoughts you want to ask, just how they do accept the terms or perhaps line up a few of the achievable selections they might possess. We normally surpass this with no paying much of an attention to the feature liable for these kinds of activities still, the Bootstrap Checkbox Input is actually a pretty serious feature-- one our forms just can't really complete without.
In the current fourth edition of the Bootstrap system we are supplied with the .form-check and .form-check-label classes so as to display the good old default checkbox feature and in the event that you would likely need to have them piled simply just ensure you have actually wrapped them within an additional <div> with the .form-check class selected to it. In order your checkboxes to display correctly in Bootstrap 4 you have to likewise assign the .form-check-label class to the <label> component and the <input> tag itself should carry the .form-check-input class.
The way to use the Bootstrap checkbox:
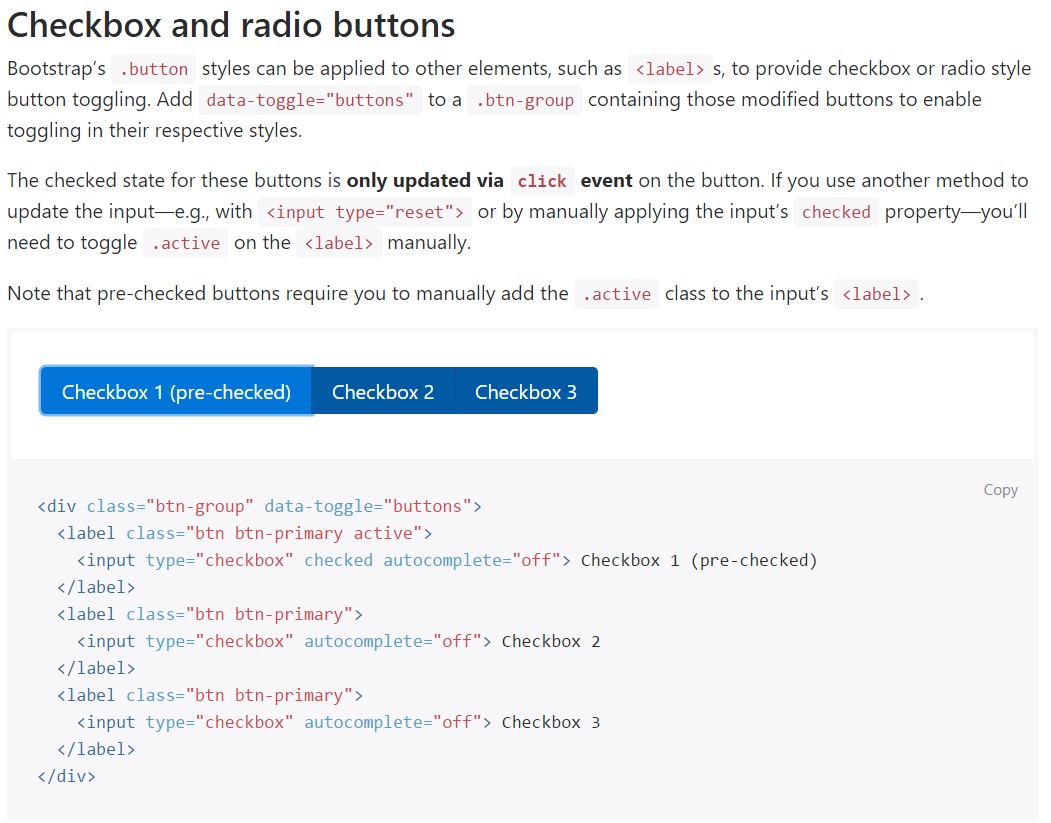
Bootstrap's .button styles might be put on some other elements, like <label>- s, to produce checkbox or radio style button toggling. Add data-toggle=" buttons" to .btn-group providing those changed buttons to set up toggling in their relevant styles. The checked state for these buttons is only updated via click event on the button.

<div class="btn-group" data-toggle="buttons">
  <label class="btn btn-primary active">
    <input type="checkbox" checked autocomplete="off"> Checkbox 1 (pre-checked)
  </label>
  <label class="btn btn-primary">
    <input type="checkbox" autocomplete="off"> Checkbox 2
  </label>
  <label class="btn btn-primary">
    <input type="checkbox" autocomplete="off"> Checkbox 3
  </label>
</div>
From time to time we require the checkboxes to arrive in our forms without the customer actually being able to make any sort of practice clicking on them-- that is definitely where exactly the disabled option appears.
If you want to disable properly a checkbox in Bootstrap 4 using the standard HTML attribute disabled attribute along with just adding it you could easily also style the cursor each time the visitor hovers over the disabled element changing it to a "not permitted " icon having your forms more very easy and natural to deal with.
On the occasion that you find appealing the concept and in fact desire to carry this out you should certainly assign the .disabled class to the parent .form-check element needed the effect to display finest while the whole element has been actually hovered-- this will make things relatively more evident
A different scenario
Anytime utilizing checkboxes, wrap all of them in a <label> element using the Bootstrap 4 .custom-control as well as .custom-checkbox classes applied.
Use .custom-control-input with the certain <input> element.
As well put into action two <span> elements: one with the .custom-control-indicator class applied, and the other with .custom-control-description ( and also put the actual label into this element).
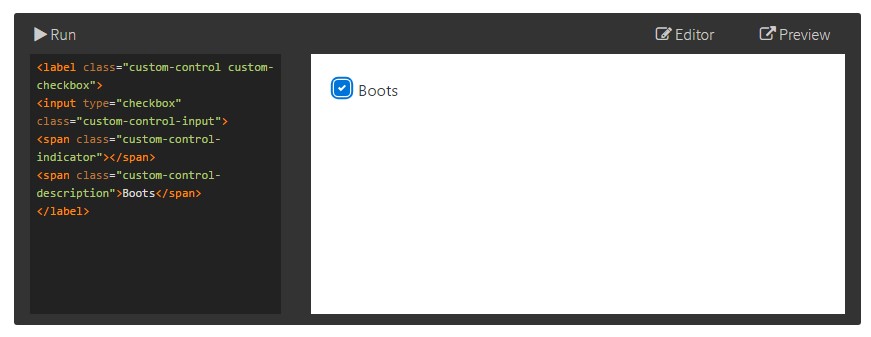
<label class="custom-control custom-checkbox">
<input type="checkbox" class="custom-control-input">
<span class="custom-control-indicator"></span>
<span class="custom-control-description">Boots</span>
</label>
Bootstrap Checkbox Label forms
Default radios and checkboxes are enhanced upon with the aid of .form-check, a specific class for each input types that improves the layout and actions of their HTML features. Checkboxes are for choosing one or a couple of selections within a selection, as long as radios are for picking one solution from several.
The disabled class will additionally lighten the message color to help signify the input's state.
A new detail for the Bootstrap edition 4 system is the creation of the so called custom form elements. These are actually the same elements we are used to in practicality though designated even more attractive and in the Bootstrap way. By having them you may put in special taste as well as individuality to your information by simply just appointing a handful of additional classes to the controls you incorporate in your forms.
In order to use custom made checkboxes wrap them within a <label> element specifying to it the .custom-control and .custom-checkbox classes. When generating the <input> element verify you have in addition added in the .custom-control-input to it. You really should as well use two <span> elements - one with .custom-control-indicator class employed and some other having the .custom-control-description class coupled with the actual explanation you would require to attach to the label your Bootstrap Checkbox Field.
Conclusions
That's mostly everything you ought to work on in order to place a checkbox element inside your Bootstrap 4 powered website and incorporate some custom flavor to it incorporating it a fantastic appeals. Currently all you ought to do is repeat the drill till you have actually inspected all the checkboxes required are actually on the webpage.
Review a couple of video clip training relating to Bootstrap checkbox
Linked topics:
Bootstrap checkbox formal records
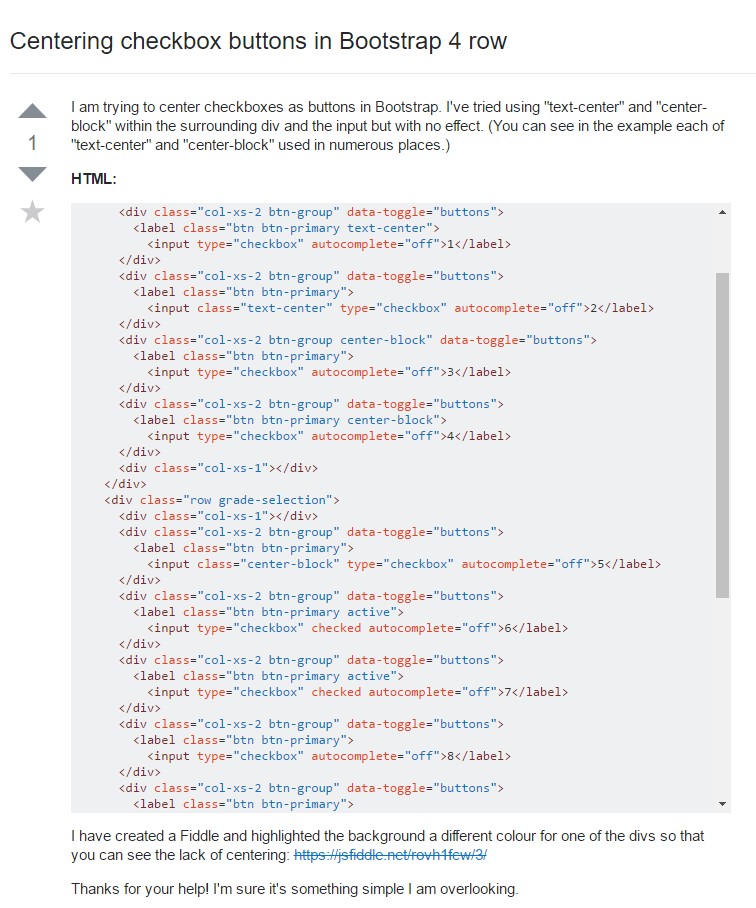
Centering checkbox buttons in Bootstrap 4 row
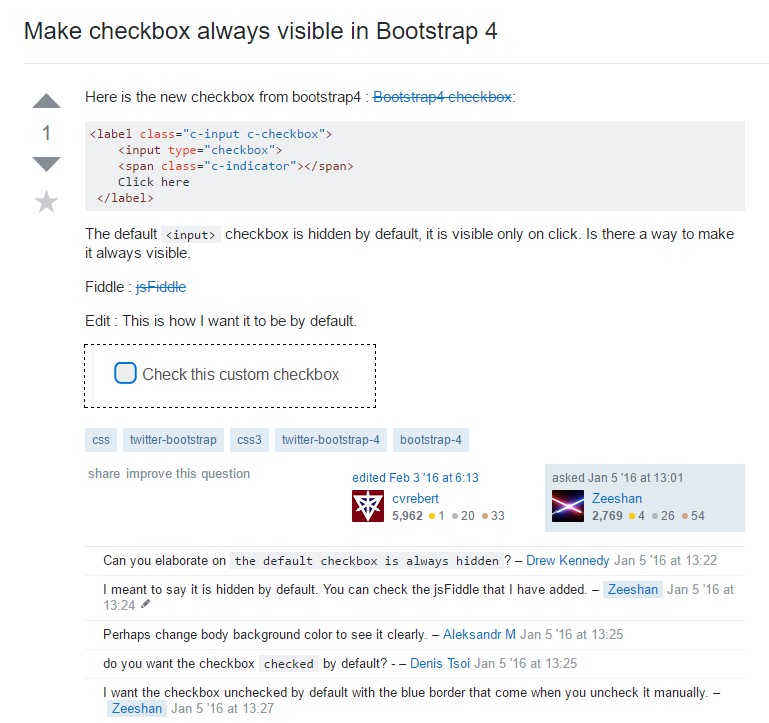
Make checkbox always visible in Bootstrap 4